Backyard privacy does not have to mean a six-foot wall around the entire property. In a lot of yards, the real problem is smaller: one neighbor window, one exposed patio, one view from the street, or one corner that never feels comfortable enough to use.
That is good news. Solving the exact line-of-sight problem is usually cheaper, faster, and better looking than fencing everything.
The 2026 outdoor design conversation is moving in that direction too. Sunset's 2026 garden trends points to intimate, layered outdoor rooms and patios that function more like living spaces. Garden Design's 2026 trends also emphasizes abundant, layered planting and nature-forward design. Privacy is not just a boundary anymore. It is part of how the space feels.
Here are nine ways to create privacy without making the yard feel boxed in.
1. Block the View From Where You Actually Sit
Do not start at the property line. Start from the chair.
Sit where you drink coffee, grill, read, or watch kids play. Then look outward and ask:
- What can I see that I do not want to see?
- What can see me?
- Is the problem at eye level, above the fence line, or from the side?
- Would a 4-foot screen solve it, or do I need height?
Many privacy problems are solved within 8 to 12 feet of the patio, not at the far edge of the yard. A small screen near the seating area can block more than a long fence in the wrong place.
This is one of the best YardRemix use cases. Take a photo from the seated view, not just the back door. Then test prompts like "add a warm wood privacy screen and layered planting behind this patio" or "add tall grasses and evergreen shrubs to block the neighbor window."
2. Use a Mixed Plant Screen Instead of One Perfect Row
Rows of one plant look clean on day one, but they carry risk. If pests, disease, drought, or a bad winter hit that one species, the whole screen can fail at once.
The University of Maryland Extension recommends using a variety of plants for privacy screens because mixed screens are more resilient to pests, disease, drought, flooding, and climate swings. It also notes that layered plants of different heights add visual interest and support wildlife.
A simple mixed screen formula:
- One evergreen layer for year-round blocking.
- One flowering or deciduous shrub layer for softness.
- One ornamental grass or perennial layer for texture at the front.
- A groundcover or mulch edge to make maintenance easier.
The result feels less like a wall and more like a designed border.
3. Stagger Plants Instead of Planting a Straight Line
A straight row makes every gap obvious. Staggering plants in two loose rows hides gaps faster and looks more natural.
Try this pattern:
- Taller evergreens or shrubs in the back row.
- Medium shrubs between the back-row gaps.
- Grasses or perennials in front.
You still need to respect mature plant width. Do not jam shrubs together just because they look small in the nursery pot. Crowded plants may create instant privacy, but they also create pruning work, airflow problems, and future removal costs.
4. Add One Slatted Screen Where It Counts
A partial wood or composite screen can be more useful than a full fence if placed correctly.
Best locations:
- Beside a patio dining table.
- Behind a grill station.
- On one side of a hot tub.
- Along a deck railing where the neighbor view is direct.
- Behind an outdoor sofa to make a lounge area feel anchored.
Slatted screens feel lighter than solid panels because they let air and filtered light through. They also pair well with plants. Put the screen where you need immediate privacy, then let vines, planters, or shrubs soften it over time.
See this idea on your own yard photo.
YardRemix turns a quick photo into AI yard concepts, so you can compare layouts, plants, patios, lighting, and budget-friendly options before you start digging.
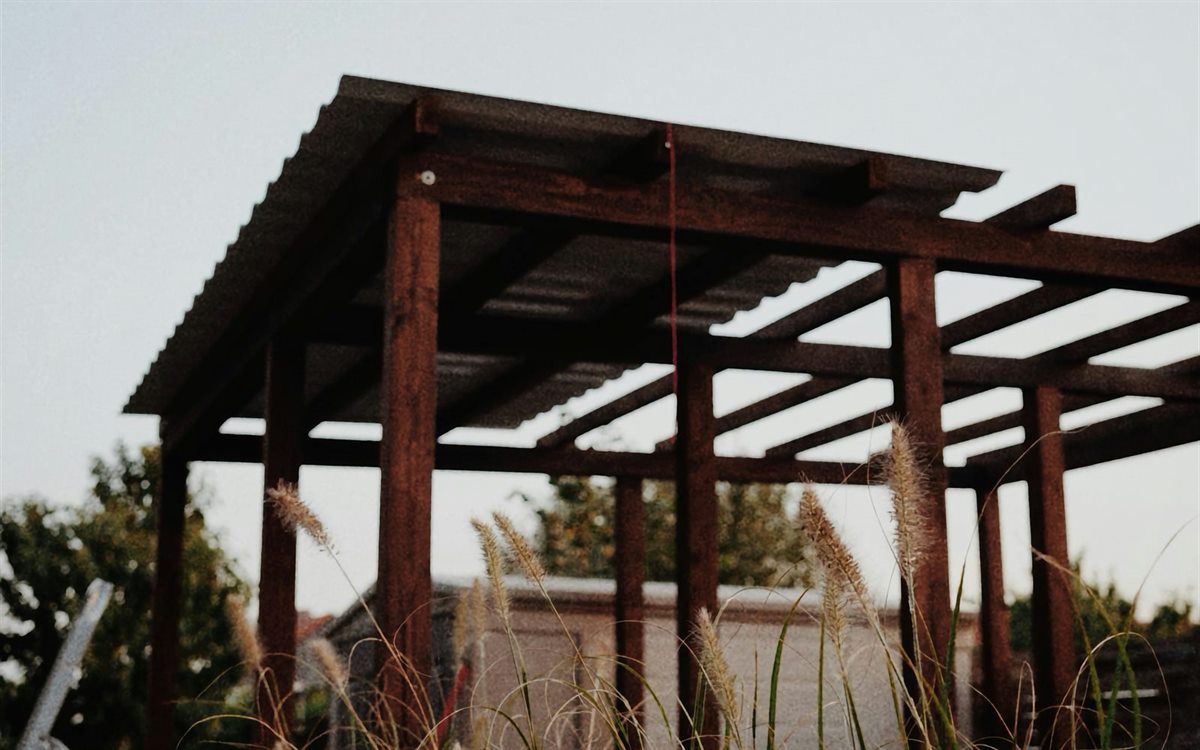
5. Build a Pergola for Overhead Privacy
Sometimes the issue is not side privacy. It is an upper-story window, a deck next door, or the feeling that the patio is too exposed from above.
A pergola can create a ceiling plane without fully enclosing the space. Add:
- Closely spaced rafters for shade and visual cover.
- Outdoor curtains on one side.
- A vine on one corner, if it suits your climate and maintenance tolerance.
- A privacy panel only where the sightline is worst.
This works especially well for small patios. Instead of trying to hide the whole yard, you create one outdoor room that feels finished.
6. Use Tall Planters for Renters or Tight Spaces
If you cannot dig, use containers.
Long rectangular planters can hold clumping grasses, compact shrubs, herbs, or small trellised vines. They are useful on:
- Rental patios.
- Townhome yards.
- Deck edges.
- Side yards with utilities.
- Concrete pads where planting beds are not possible.
The key is scale. Tiny pots will not create privacy. Use fewer, larger containers that look intentional and can hold enough soil to support healthy plants.
7. Raise the Planting Bed
Privacy is about height, and height does not have to come only from the plant.
A raised bed, low berm, or retaining wall can lift the planting zone by 12 to 24 inches. That can turn a 4-foot shrub into a 6-foot visual screen from the patio's point of view.
This approach is useful when:
- You need privacy quickly but do not want very tall plants.
- The yard is flat and visually exposed.
- You want a cleaner edge around a patio.
- Soil drainage is poor in the planting area.
Do not build berms against fences, tree trunks, or foundations without understanding drainage. The raised edge should improve the yard, not push water somewhere worse.
8. Avoid Invasive "Fast Privacy" Plants
Fast is tempting. Bamboo, invasive privet, barberry, and aggressive vines often get recommended because they fill space quickly. They can also become expensive maintenance problems.
The University of Maryland Extension specifically warns against invasive plants such as bamboo and Japanese barberry in privacy screens. Your region may have different problem species, so check local guidance before buying anything marketed as fast-growing.
Better strategy:
- Use a small screen or trellis for immediate cover.
- Plant slower, better-behaved shrubs behind it.
- Let the living screen mature without relying on a plant you may regret.
9. Add Night Privacy With Lighting, Not Floodlights
At night, privacy changes. A brightly lit patio can make you feel like you are on stage, especially if the yard around it is dark.
Use low, warm, shielded lights instead of bright overhead floodlights:
- Path lights aimed downward.
- Small lights under benches or planters.
- String lights tucked under a pergola.
- Warm wall sconces pointed away from neighbors.
This creates a comfortable glow inside the outdoor room while reducing glare outward. It also makes planting screens more effective because the eye stays inside the lit area.
A Simple Weekend Privacy Plan
If you want a realistic starting project, do this:
- Take one photo from your most-used seating area.
- Mark the one or two worst sightlines.
- Decide whether you need instant privacy, living privacy, or both.
- Choose one fixed element: slatted screen, pergola, planter row, or raised bed.
- Add one plant layer now and leave room for mature size.
- Preview two or three versions in YardRemix before buying materials.
You do not need to solve every view. You need to make the best part of the yard feel usable.
Preview the Screen Before You Build It
Privacy projects are easy to overbuild because homeowners cannot visualize partial solutions. A fence feels certain. A layered screen takes imagination.
YardRemix gives you a faster way to test that imagination. Upload a photo of the patio, deck, side yard, or exposed corner. Try prompts like "add a mixed evergreen privacy screen with flowering shrubs," "add a modern slatted wood screen and tall grasses," or "add a pergola with outdoor curtains and warm lighting."
Then compare the results. You may find that a 10-foot screen in the right place solves the problem better than 80 feet of fencing. That is the kind of decision that can save money, preserve openness, and make the backyard feel designed instead of barricaded.
Turn the idea into a visual plan before you spend a weekend on it.
Download YardRemix, snap a photo, and test yard designs with AI. It is a faster way to compare styles, avoid expensive guesses, and share a clearer direction with a contractor or helper.